Xilisoft Video Converter Ultimate
Xilisoft Video Converter Ultimate Tutorial
Referring FAQHow to convert video files using this video converter? The following will show you a step-by-step guide to complete conversion tasks.
This article includes 7 parts.
- Getting Started
- Clip Video/Audio File
- Create Merged Item
- Edit Merged Video Item
- Edit Merged Picture Item
- Add and Edit Video Effects
- More Applied Skills
Firstly, download Xilisoft Video Converter Ultimate and then install and run it.
Getting Started
Step 1: Install and run the software
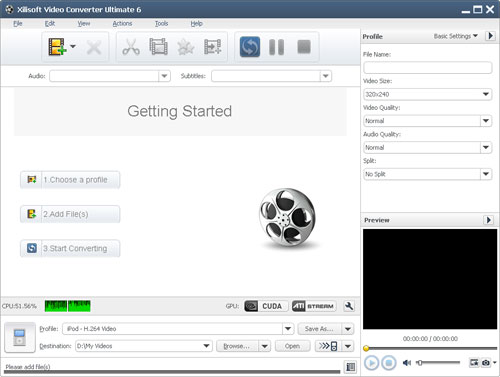
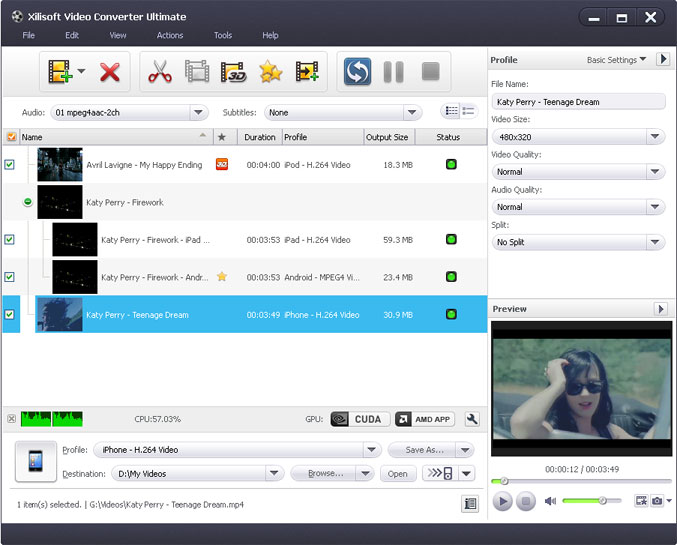
After installation, run the software. You can see the main interface as below.
Step 2: Add File
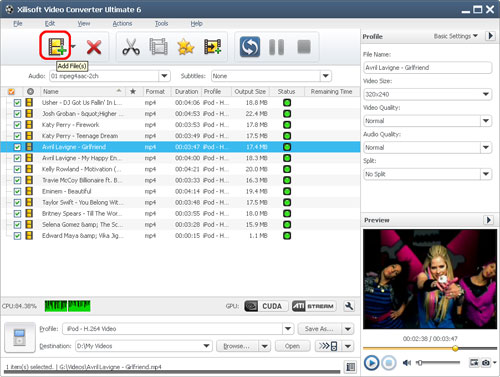
Click "Add File(s)" button on the toolbar or select "File> Add File(s)" on the main menu to load files.
Step 3: Select output format
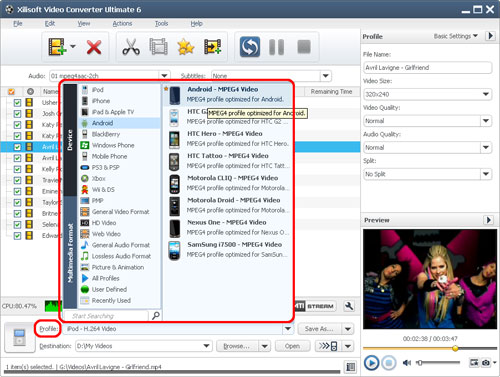
Select the files need to be converted and click "Profile" button to select the output format in the drop-down list. Then click "Browse…" button to specify destination folder for saving output files.
Tips:
- We provide abundant profiles compatible with various popular devices .Especially all-around HD video formats are supported.
- Many options for you to choose. The "Recently Used" option can record your recent usages automatically and it is convenient to use them again.
- Search for the wanted profile quickly by entering the profile keyword in " Start Searching" textbox of the profile list.
Step 4: Convert
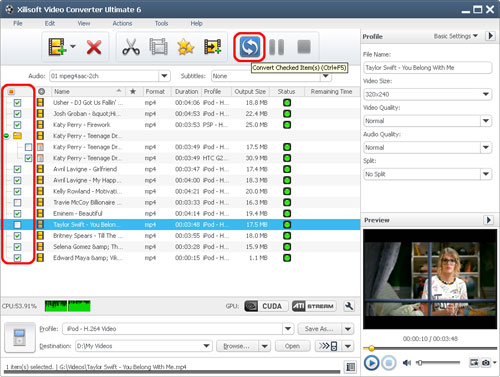
After selected output profile, you only need to check the files you want to convert in the file list and click "Convert Checked Item(s)" button on the toolbar to complete the task.
Ok, the above is the simplest function in conversion. We provide you more functions as below!
Clip Video/Audio Files
At first, choose the video file you want to clip. Then click " Clip" button on the toolbar to enter "Clip" window. Set the start & end point to get the partial segment and repeat the action to get several segments at will. After clipping, check the "Output segments as a whole one" option and merge the segments in the list into one file. And then click "Move Up" or "Move Down" button to specify the sequence of these segments.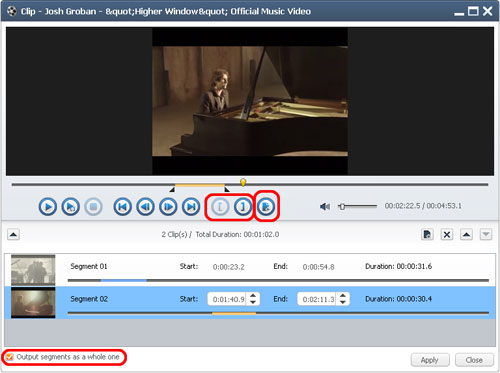
Create Merged Item
Select multiple files and click "Merge Selected Item into One" button on the toolbar to merge the selected files into one and create a merged item in the file list.
Tip: Only the files of same kind can be merged. E.g. video files cannot be merged with pictures.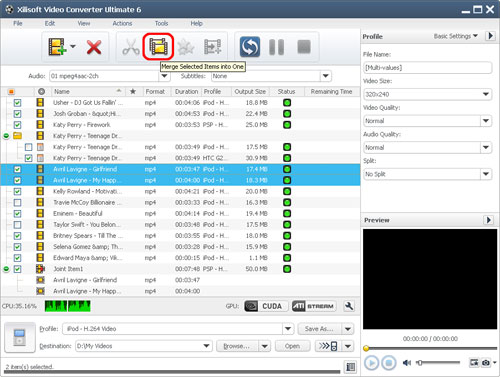
Edit Merged Video Item
Firstly, right-click a merged video item in the file list, and select "Edit Joint Item" option from the right-click menu to open "Joint Item" window. Then select a video transition item and choose a transition effect from the transition panel on the left. Repeat this step to add transition effects to other videos. After adding transitions, choose a time length from "Duration" drop-down list as the transitional duration, and use "Move Up" or "Move Down" option to adjust the order of video items.
Tips:
- From "Setting" drop-down list, choose "Restore Defaults" to restore the default. Or select "Apple to All Transitions" to apple the above settings to all the sub-items in this joint item.
- On the right preview panel, click "Play" button to preview the merged items with the added transitions.
Edit Merged Picture Item
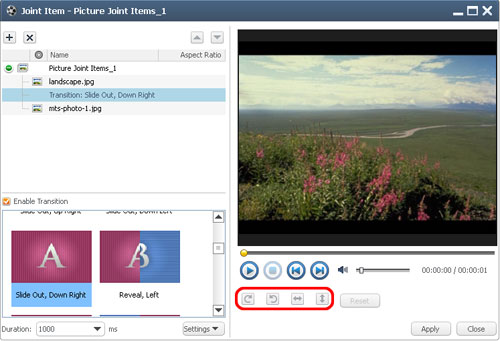
Right-click a merged picture item in the file list and choose "Edit Joint Item" option from the right-click menu to open " Joint Item" window. Choose a picture item and set the picture's direction by clicking "Rotate Clockwise", "Rotate Counterclockwise", "Flip Horizontal" or " Flip Vertical" button on the top right settings panel. Then you can adjust the order of the picture items by clicking "Move Up" or "Move Down" button, and click "Reset" button to reset all the settings to default.
You can also add transition effects for each picture item and choose a time length as the transition duration like what you have done in "Edit Merged Video Item" part.
Add and Edit Video Effects
Firstly, choose the video you want to edit, and then click "Effects" button on the toolbar to enter "Effects" window.
Crop the video size
On "Crop" tab, enter height, width, left margin and top margin values to set the size and the position of the crop area. You can also adjust the crop area size and position by dragging the resizable handle and frame.
Besides, you can also check "Keep Aspect Ratio" option and choose the aspect ratio from the drop-down list. Click "Restore Defaults" to restore all settings to default, and preview the real-time effect in preview window on the right.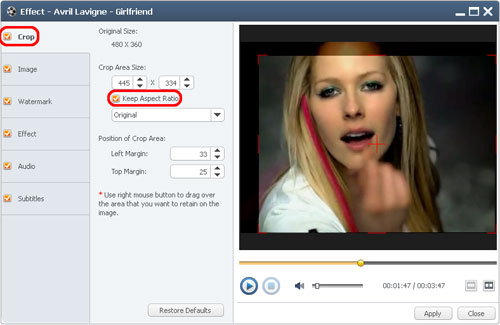
Edit video image
On "Image" tab, enter the value of the brightness/contrast/saturation in corresponding textboxes to set the video image's brightness/contrast/saturation.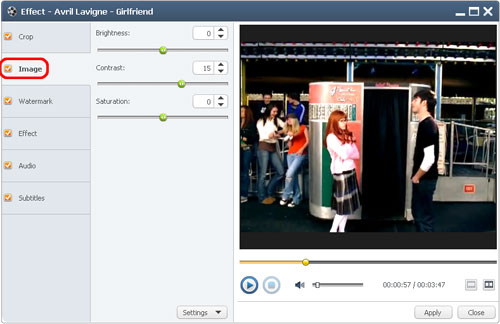
Add watermarks to video
In "Watermark" tab, click "Add Text Watermark" or "Add Picture Watermark" button to import watermarks into the watermark list. Select a watermark and set its transparency, vertical position, horizontal position, font, color, size or style .
Tip: You can add multiple picture and text watermarks into one video simultaneously.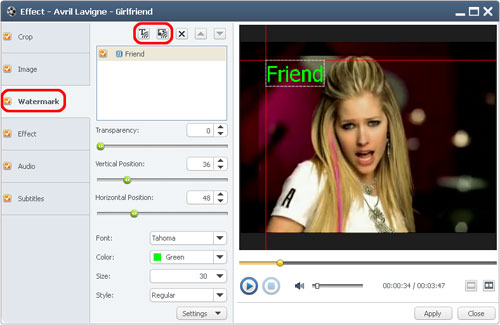
Add Effect to video
In "Effect" tab, choose one or more effects for the output video from the effect list.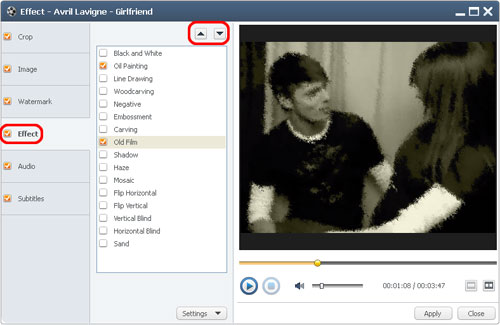
Add background music to video
In "Audio" tab, click "Add Audio Track" button to add audio tracks into the list. And then choose the wanted one from the list as the background music for the video. You can also set the play mode as "Loop" or "Play Only Once".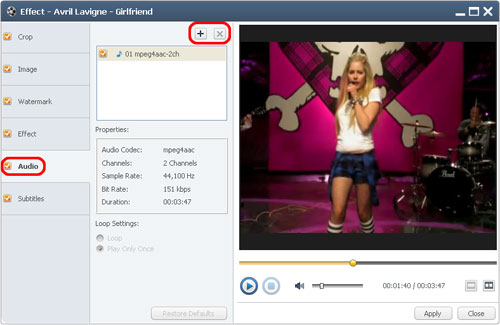
Add and adjust subtitle to video
In "Subtitle" tab, click "Add Subtitles" button to load the desired subtitles into the list. Then select a subtitle from the list and adjust its transparency, vertical position, font, color, size, style and line spacing at will.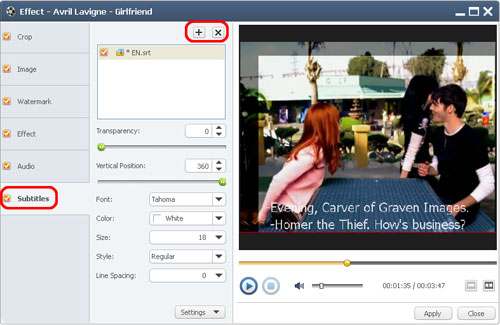
Compare the edited video with the source one
Click "Comparing Preview" button on the right preview panel to compare the edited file with the source.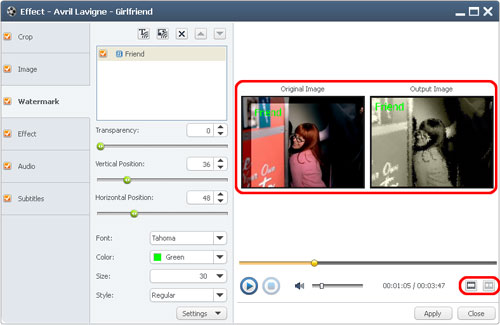
More Applied Functions
Add profiles for the same video file
Select the video and click "Add Output Profile" button to set multiple output formats for one file simultaneously. You can get different video formats for various digital players after conversion.
Gain exact video file size using bitrate calculator
To custom output size, select the video file and click Tools >Bitrate Calculator and input value to get exact video size.
Divers parameters for you to choose
Firstly, click Tools >Preferences to set various parameters such as amount of running processed, action "After Done" and etc.
You can also click the "Advanced Profile Settings" button on the top right panel and adjust various video/audio parameters for more needs.
Xilisoft Video Converter Ultimate 6.5.3 build 0310Xilisoft Video Converter là phần mềm chuyển đổi video mạnh mẽ, linh hoạt có khả năng chuyển đổi video với mọi định dạng thông dụng như AVI sang MPEG, WMV sang AVI, WMV sang MPEG, H.264 video, v...v. Không một chương trình nào khác ngoài Xilisoft Video Converter hỗ trợ các định dạng video một cách thật toàn diện bao gồm DVD, VCD, SVCD, AVI, MPEG, MP4, WMV, 3GP, H.264/MPEG-4 AVC, H.264/PSP AVC Video, MOV, RM, ASF, FLV, SWF, v..v. Thêm vào đó, trình chuyển đổi video giúp bạn dễ dàng chuyển đổi file video thành các định dạng audio thông dụng như MP2, MP3, AC3, RA, M4A, OGG, AAC v...v. Trình chuyển đổi video cũng hỗ trợ giải mã APE, CUE và trích xuất audio CD
Xilisoft Video Converter hỗ trợ các thiết bị đa phương tiện thông dụng như PSP, iPod, MP4 player, mobile phone, Zune, iPhone, BlackBerry v...v. Mọi thao tác chuyển đổi, như AVI sang MPEG, WMV sang MPEG, WMV sang AVI, đều rất dễ dàng và nhanh chóng với chất lượng cao nhất. Chương trình tăng tốc độ chuyển đổi lên 200% khi chuyển đổi avi sang mpeg, wmv sang avi, wmv sang mpeg, vượt xa trí tưởng tượng của bạn. Mọi bộ mã hóa/giải mã đều được tích hợp. Người dùng có thể chuyển đổi mọi định dạng được hỗ trợ một khi đã download chương trình về
Đặc điểm của Xilisoft Video Converter:Tính năng của Xilisoft Video Converter:• Chương trình hỗ trợ chuyển đổi sang định dạng PSP video, iPod video, 3GP video, Zune video, iPhone MP4, BlackBerry v....v
• Hỗ trợ định dạng H.264 video, mã hóa/giải mã PSP MPEG-4 AVC , PSP AVC Video (480x272) (*.mp4);
• Trình thuật sĩ chuyển đổi video đã được thiết kế và thêm vào dành cho người dùng ít kinh nghiệm, hướng dẫn quá trình chuyển đổi
• Tính năng Zoom và tách đã được bổ sung trong phiên bản Xilisoft Video Converter 3.1
• Chương trình hỗ trợ chuyển đổi hàng loạt và xử lí đa luồng, bạn có thể chuyển đổi nhiều file cùng lúc
• Chương trình có thể chuyển đổi từng đoạn một. Bạn có thể chuyển đổi phân đoạn nhờ cài đặt điểm xuất phát và độ dài tùy thích;
• Trình chuyển đổi video cho phép duyệt trước
• Khi chuyển đổi file, bạn có thể tạm dừng, dừng hẳn và tiếp tục bất cứ khi nào
• Bạn có thể giữ các thông số cài đặt mặc định hoặc tự mình tinh chỉnh các thông số của bộ giải mã video và audio.Giao diện• Bao gồm các tính năng của 3GP Video Converter, iPod Video Converter, PSP Video Converter, Zune Video Converter, AVI MPEG Converter, MP4 Video Converter, MOV converter v...v
• Chuyển đổi giữa những định dạng video thông dụng như AVI, MPEG, WMV, MPEG1/2/4, 3GP, H.264, MP4, DVD, VCD, SVCD, MOV, RM, ASF;
• Chuyển đổi video thành các dạng file audio thông dụng bao gồm MP2, MP3, AC3, RA, M4A, OGG, AAC.
Kích thước | 29.6 Mb
Trang chủ
TẢI VỀ
Cracked:
Hướng dẫn:Copy File Cracked vào ổ cài (C:\Program Files\Xilisoft\Video Converter Ultimate 6)
Vào Help > Enter License code... > Nhập Code sau:Code:Name: Fri360 [KhaHp1902] S/N: STX!LZ18710204340OQBBBDD-F04E-D02B-B4A2
Hoặc
Serial AD12-56D3-635C-B099-542E-70FC-B269-973A
(Name tùy ý)
TẢI ĐẦY ĐỦ



0 Nhận xét:
Đăng nhận xét
Đăng ký Đăng Nhận xét [Atom]
<< Trang chủ